Facebook Pixel and Facebook Conversions API
Recently I got a Trello ticket to add Facebook Pixel tracking code, and they gave me a token to use. As a frontend engineer on that project, it’s confusing to me, because the token is for Facebook Conversions API. The biggest difference between Facebook Conversions API and Facebook Pixel is Facebook conversions API is invoked on the server, and Facebook Pixel is on the client. Besides, Facebook Conversions API is to solve IOS 14 updates. Now, let me write the usage of Facebook Conversions API down.
Get Facebook Conversions API token.
You may be familiar with this page if you’re using Facebook Pixel. Let’s go to Settings and click Get Started in Conversions API, and select Events we are interested. 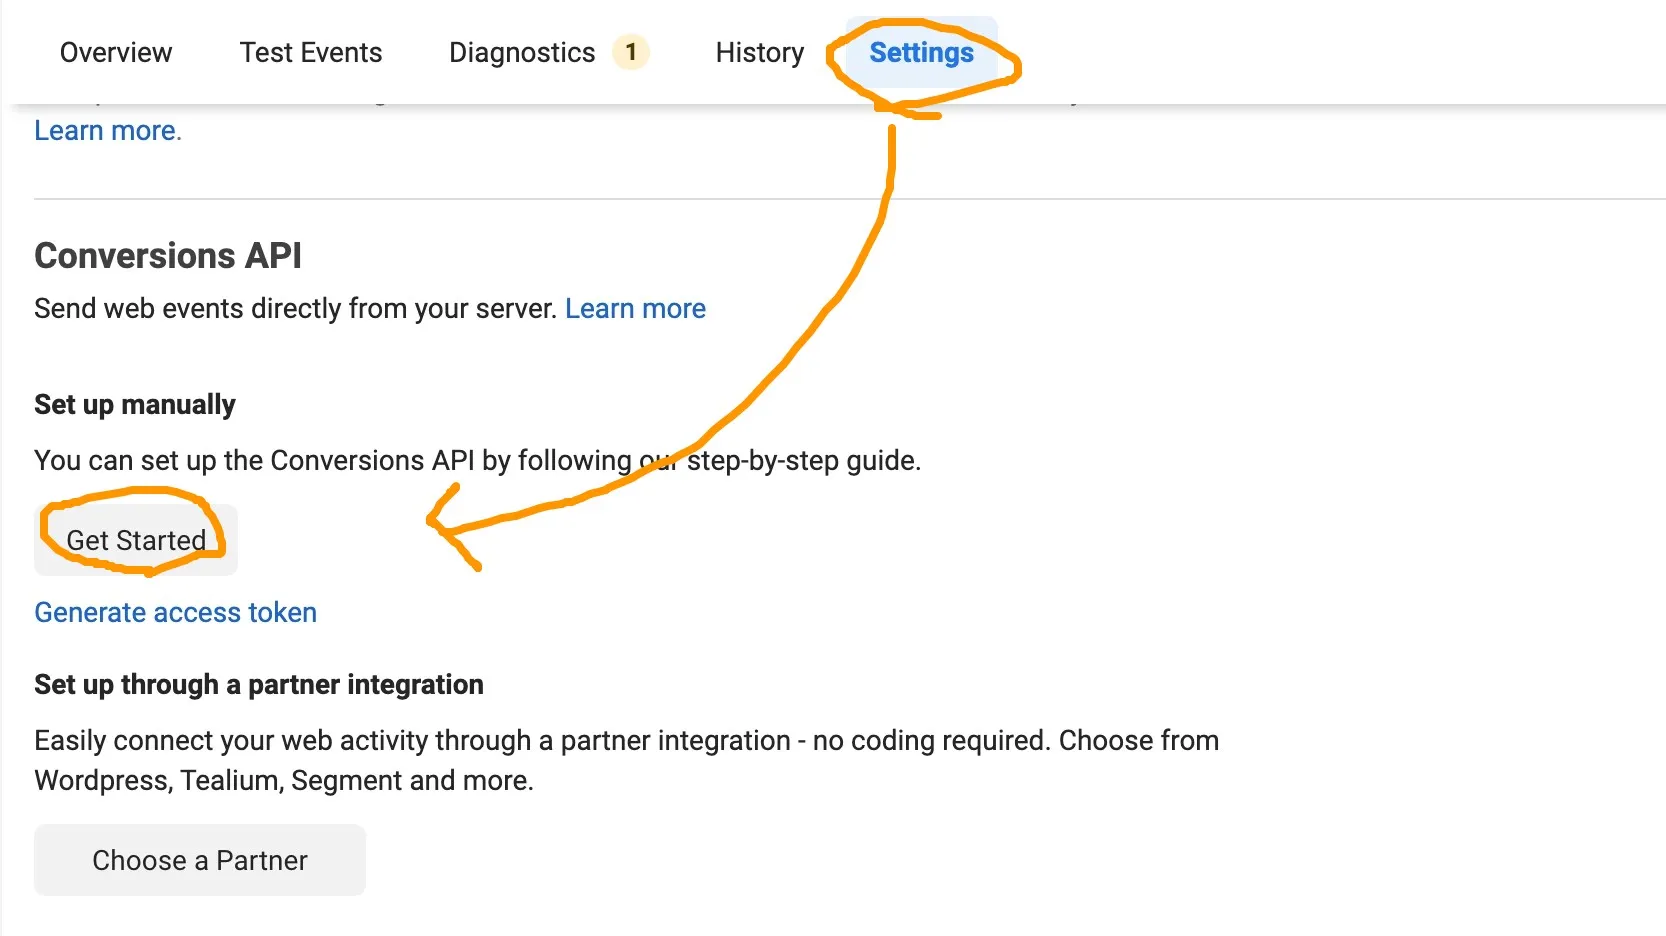
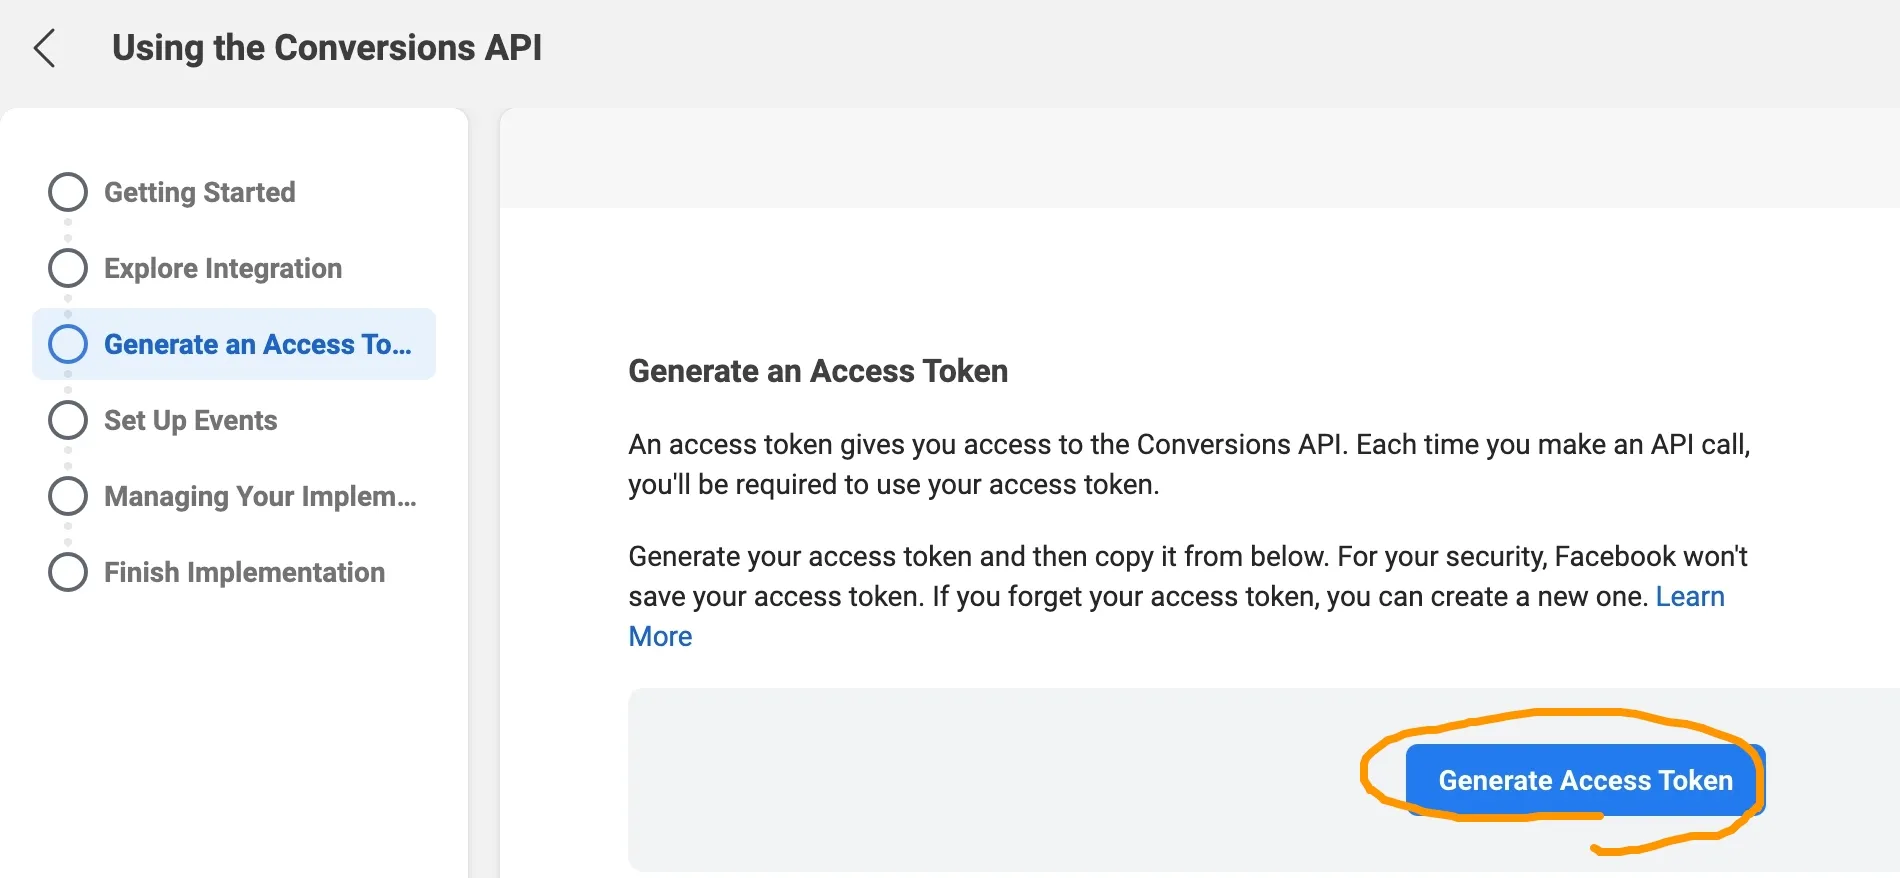
In the final step, clicking Open Implementation Guide then redirects to Using the Conversions API page to Generate Access Token. 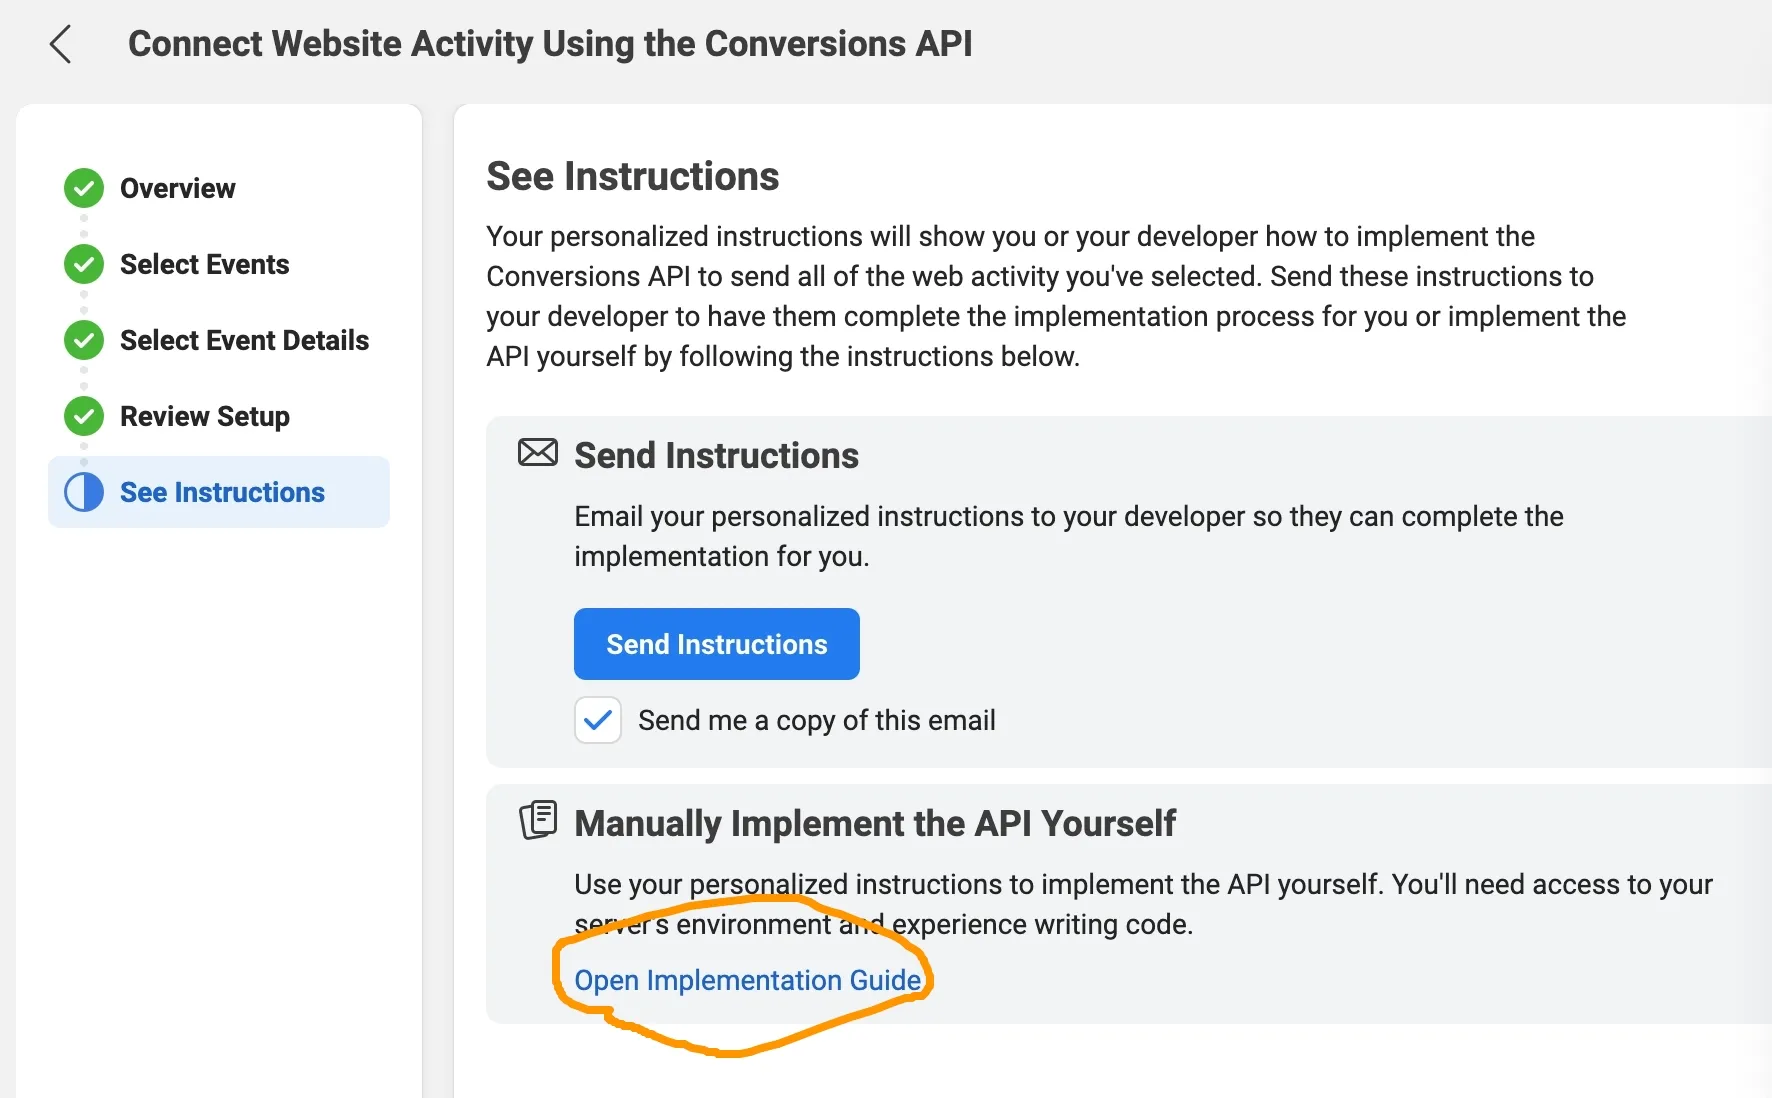
Make a POST request
To send new events, make a
POSTrequest to this API’s/eventsedge from this path:https://graph.facebook.com/{API_VERSION}/{PIXEL_ID}/events?access_token={TOKEN}.
As we saw here, it’s just a POST request. We can try it with Graph API Explorer. 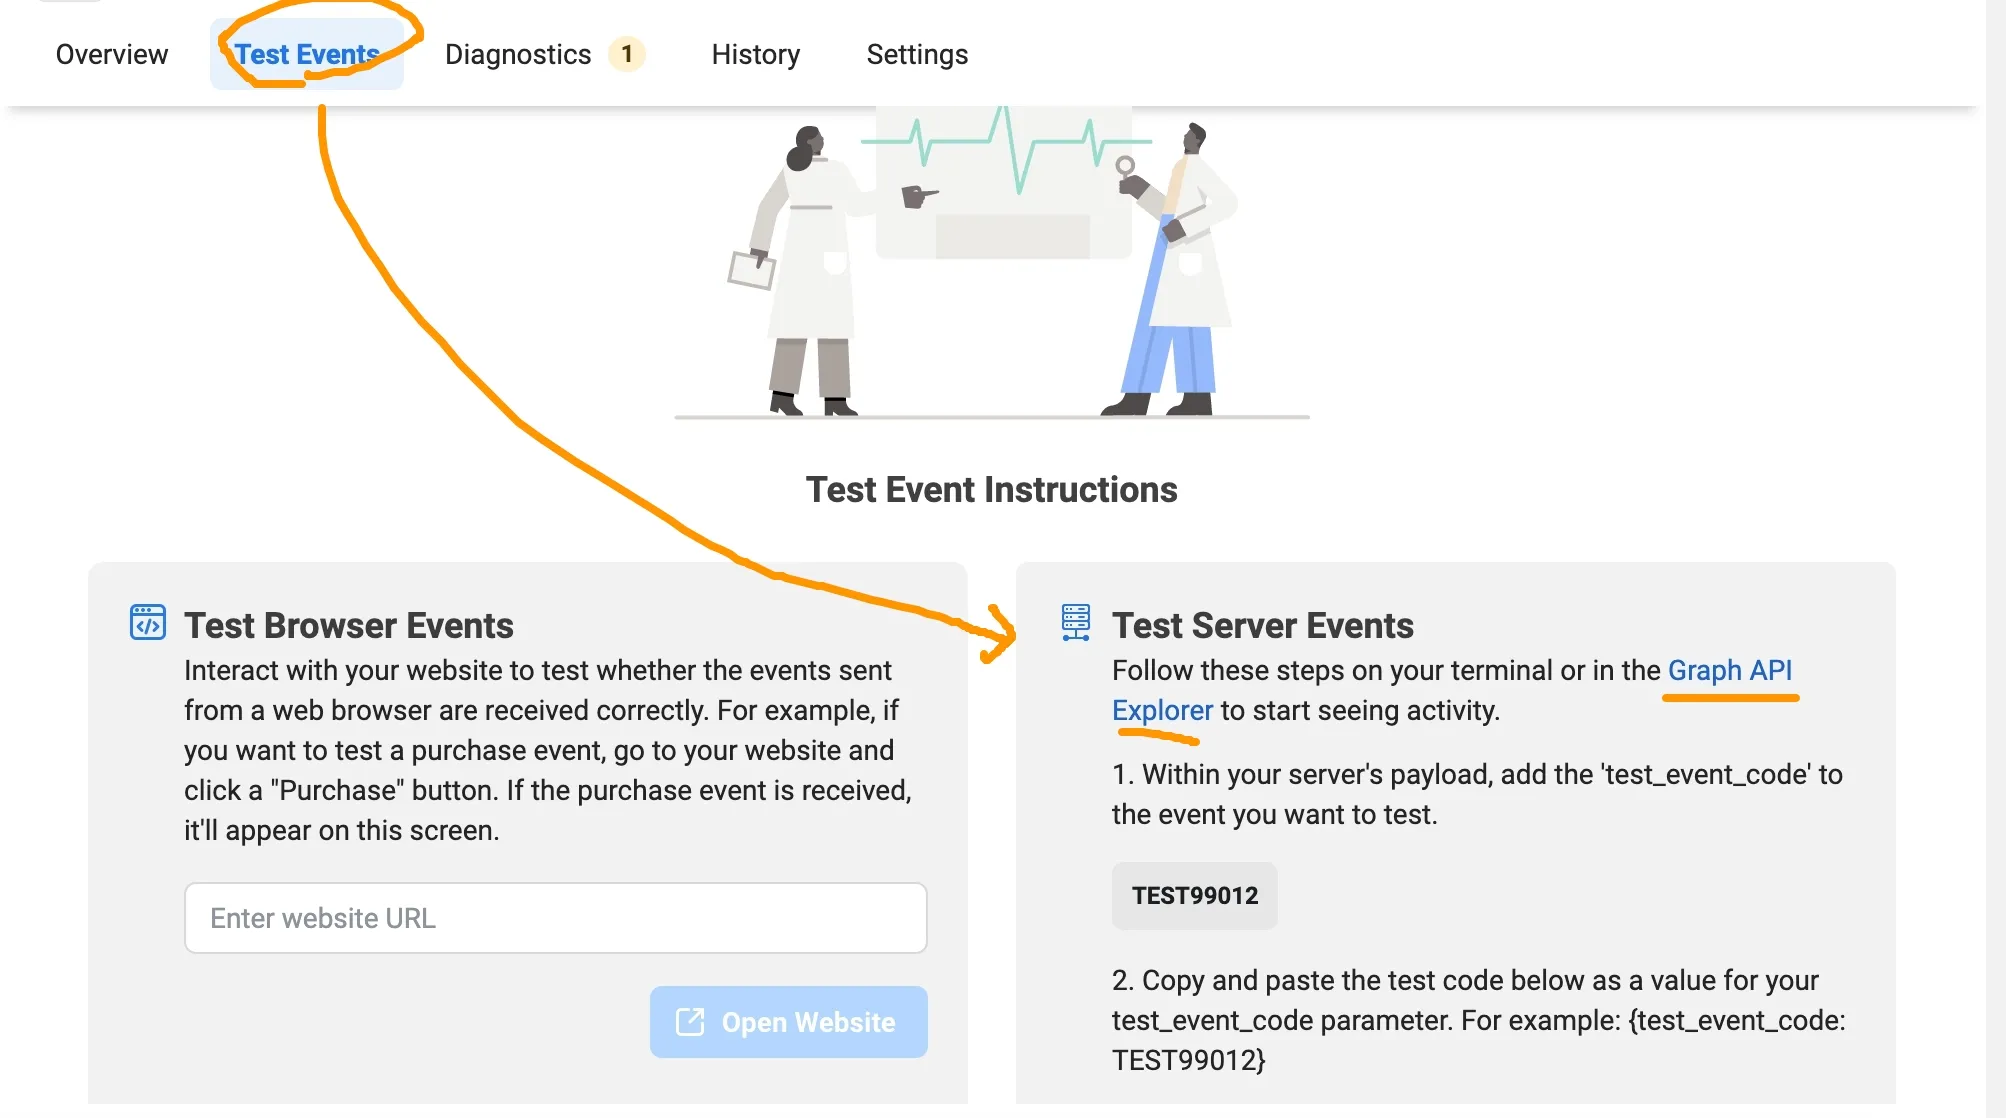
{
  "data": [
    {
      "action_source": "website",
      "event_id": 12345,
      "event_name": "TestEvent",
      "event_time": 1633340316,
      "user_data": {
        "client_user_agent": "Mozilla/5.0 (iPhone; CPU iPhone OS 13_3_1 like Mac OS X) AppleWebKit/605.1.15 (KHTML, like Gecko) Version/13.0.5 Mobile/15E148 Safari/604.1",
        "em": "f660ab912ec121d1b1e928a0bb4bc61b15f5ad44d5efdc4e1c92a25e99b8e44a",
        "client_ip_address": "11.22.33.44"
      }
    }
  ],
  "test_event_code": "TEST99012"
}
You have to add client_ip_address to JSON, or the POST request won’t be tracked. Now back to the Test Events tab to see the result. 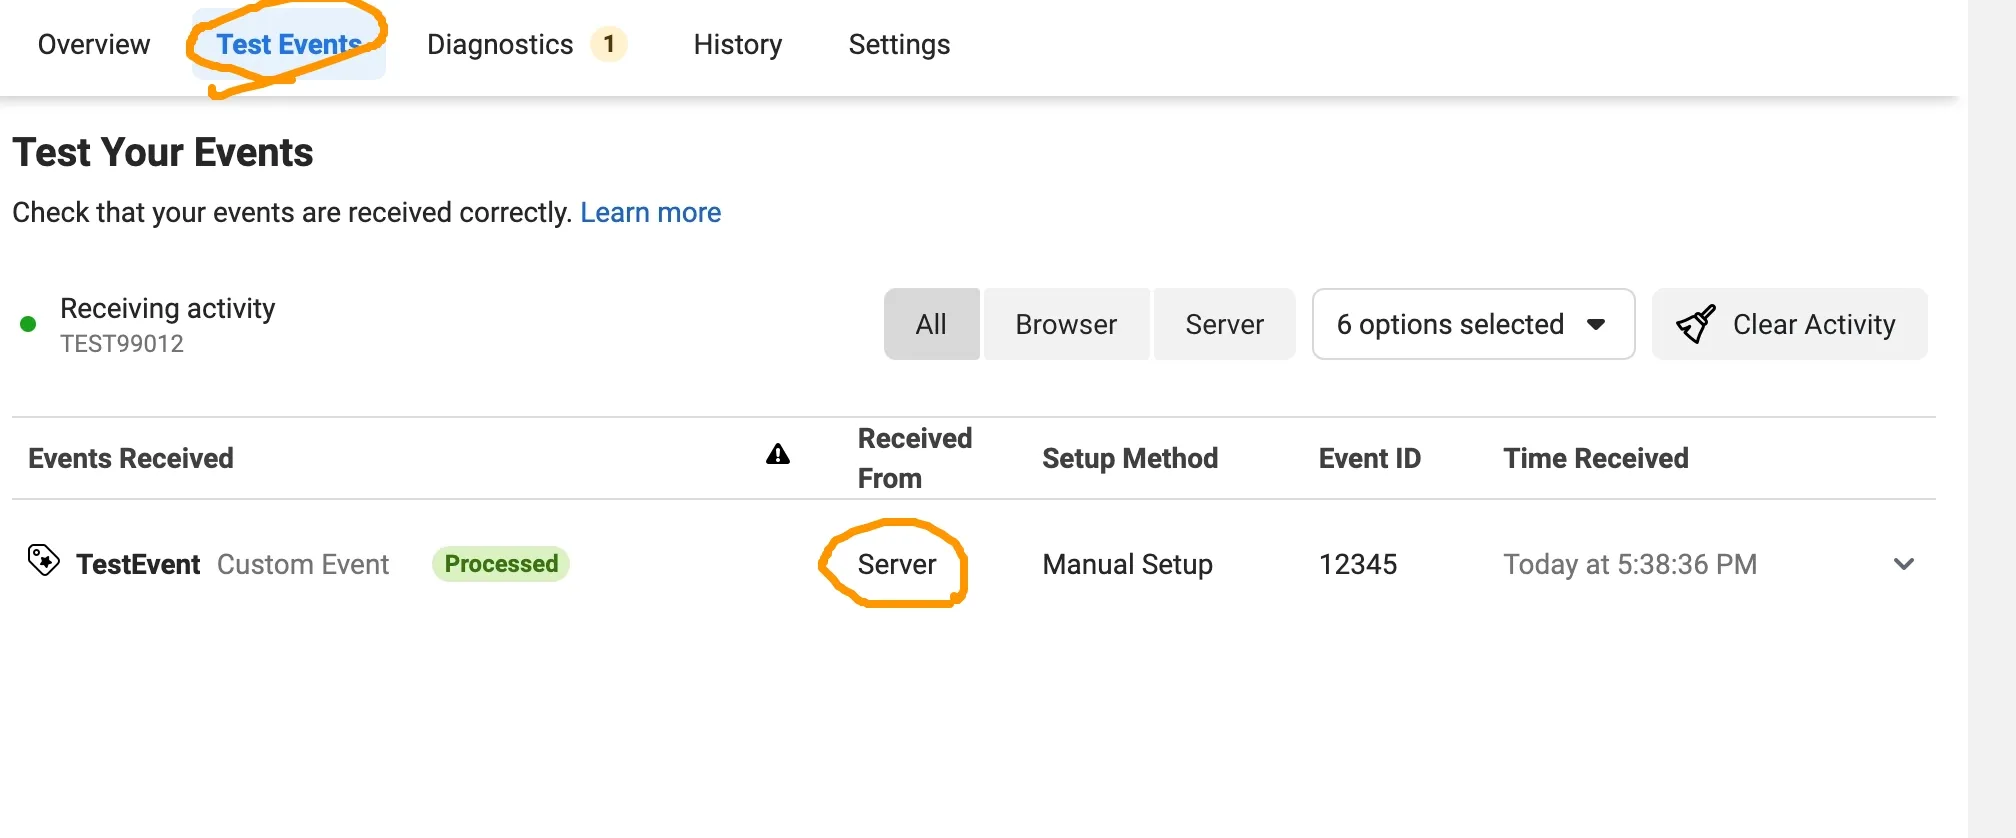
Also, the View Details of TestEvents in Overview shows the POST request log. 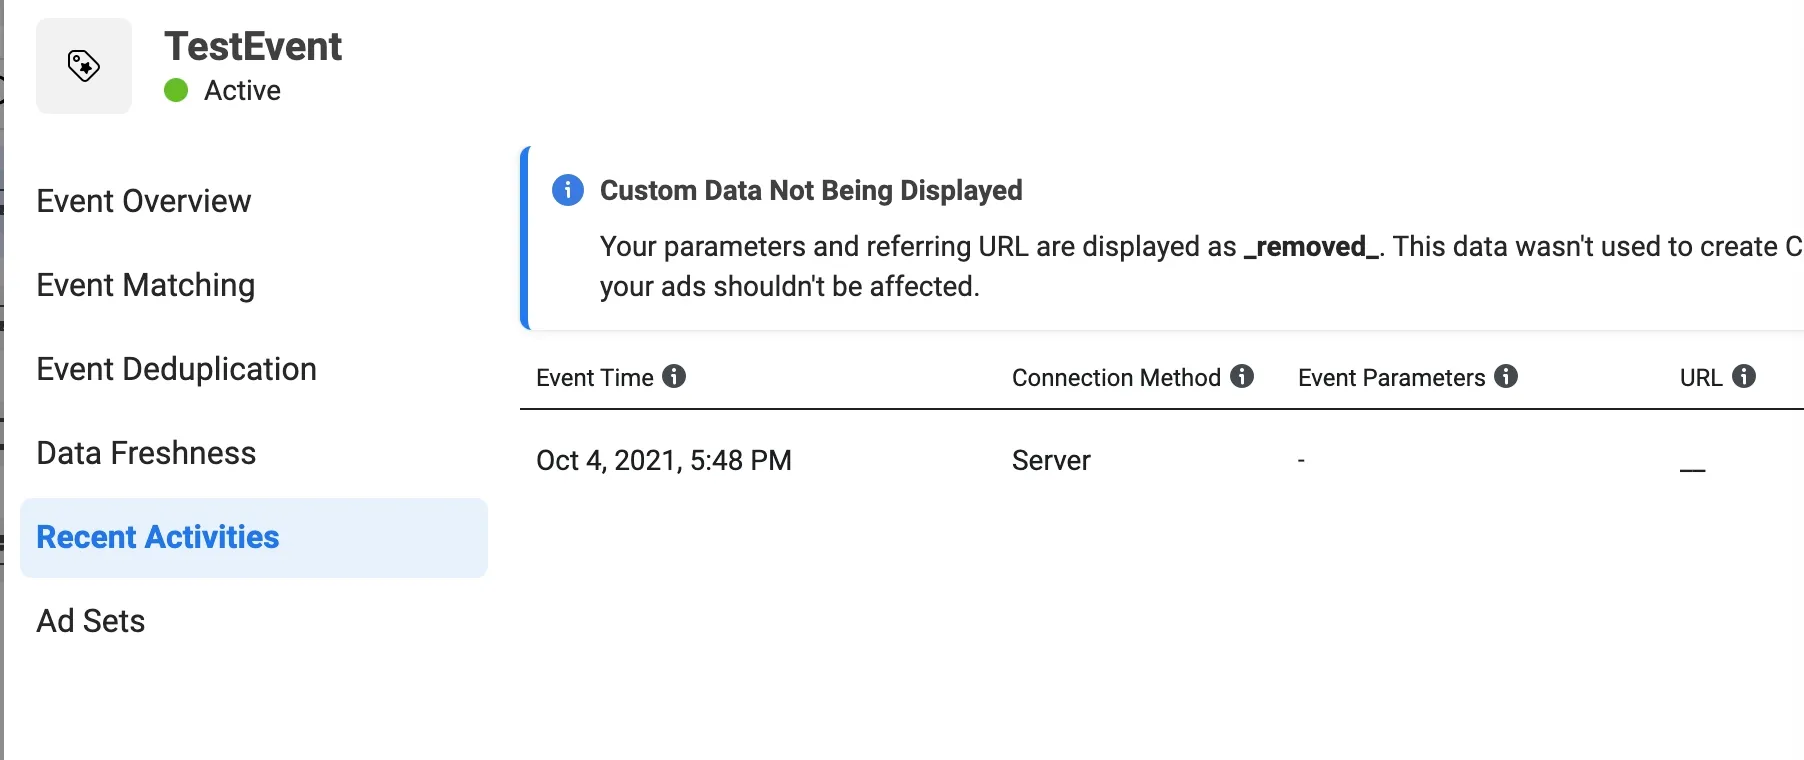
Let’s Code.
I run serverless lambda by AWS CDK, and set the token to AWS SecretManager. The following code is my Stack sample.
import * as cdk from '@aws-cdk/core';
import * as lambda from '@aws-cdk/aws-lambda';
import * as apigw from '@aws-cdk/aws-apigatewayv2';
import { CorsHttpMethod } from '@aws-cdk/aws-apigatewayv2/lib/http/api';
import * as secretsmanager from '@aws-cdk/aws-secretsmanager';
import * as apigwIntergration from '@aws-cdk/aws-apigatewayv2-integrations';

const params = {
  ApiStack: {
    ENV: 'staging',
    secretManager: {
      arn: '{SecretARN}',
      keys: ['facebookConversionApiToken']
    },
    fbPixelID: 'YOUR_PIXEL_ID'
  },
}

export class ApiStack extends cdk.Stack {
  constructor(scope: cdk.App, id: "ApiStack", props?: cdk.StackProps) {
    super(scope, id, props);

    const envParams = params[id];
    // Dynamoose();
    const { ENV } = envParams;
    const layerCommon: lambda.ILayerVersion = new lambda.LayerVersion(this, "LayerCommon", {
      compatibleRuntimes: [lambda.Runtime.NODEJS_14_X],
      code: lambda.Code.fromAsset('layer/common'),
    });

    const secret = secretsmanager.Secret.fromSecretCompleteArn(scope, 'ImportedSecret', envParams.secretManager.arn);
    const secretParams = envParams.secretManager.keys.reduce((params, key) => ({ ...params, [key]: secret.secretValueFromJson(key) }), {}) as { facebookConversionApiToken: string };
    const funcDefaultProps = {
      runtime: lambda.Runtime.NODEJS_14_X,
      code: new lambda.AssetCode('src'),
      memorySize: 1536,
      environment: { ENV }
    };
    const facebookConversionLambda = (layers: lambda.ILayerVersion[]) => new lambda.Function(scope, 'facebookConversion', {
      ...funcDefaultProps,
      handler: 'controllers/facebook_conversion/index.handler',
      layers,
      tracing: lambda.Tracing.ACTIVE,
      timeout: cdk.Duration.seconds(300),
    })

    const FacebookConversionLambda = facebookConversionLambda([layerCommon]);

    [ FacebookConversionLambda ].forEach((lambdaFunc) => {
      const envs: {[key: string]: string} = { fbToken: secretParams.facebookConversionApiToken, fbPixelID: envParams.fbPixelID }
      Object.keys(envs).forEach((key) => {
        lambdaFunc.addEnvironment(key, envs[key]);
      });
    });

    const eventLambdaMapping = {
      facebookConversion: FacebookConversionLambda,
    };

    const httpApi = new apigw.HttpApi(scope, id, {
      createDefaultStage: false,
      corsPreflight: {
        allowHeaders: ['Authorization', 'Content-Type'],
        allowMethods: [CorsHttpMethod.GET, CorsHttpMethod.HEAD, CorsHttpMethod.OPTIONS, CorsHttpMethod.POST, CorsHttpMethod.PUT, CorsHttpMethod.DELETE],
        allowOrigins: ['*'],
      },
    })
    httpApi.addRoutes({
      path: '/fb_conversion',
      methods: [apigw.HttpMethod.POST],
      integration: new apigwIntergration.LambdaProxyIntegration({
        handler: eventLambdaMapping["facebookConversion"],
      }),
    });
  }
}
And here is my lambda and class. lambda
import {
  responseSuccess,
  responseError,
} from '../../helpers/response';

const baseHandler = async (event: APIGatewayProxyEventV2) => {
  /***** Controller actions begin ******/
  const postConversion = async () => {
    const { event_name, event_id, event_source_url, user_data = {}, custom_data = {} } = JSON.parse(event.body || '{}');
    const facebookSsApi = new FacebookServerSideApi(
      { eventName: event_name, eventId: event_id, eventSourceUrl: event_source_url },
      user_data,
      custom_data
    );
    const result = await facebookSsApi.request();
    return result ? responseSuccess({}) : responseError({ statusCode: 400, message: 'Facebook Conversions Api request failed' });
  };

  switch (event.requestContext.http.method) {
    case "POST":
      return await postConversion();
    default:
      break;
  }
  return responseError({ message: "Undefined method" });
};

export const handler = baseHandler;
FacebookServerSideApi
const fetch = require("node-fetch");

class FacebookServerSideApi {
  private uri: string;
  private fbToken: string;
  private eventName: string;
  private eventId: string;
  private eventSourceUrl: string;
  private userData: Record<string, any>;
  private customData: Record<string,any>;

  constructor(eventObj: {eventName: string, eventId: string, eventSourceUrl?: string}, userData: Record<string, any>, customData: Record<string, any>) {
    const pixelId = process.env.fbPixelID as string;
    this.fbToken = process.env.fbToken as string;
    this.uri = `https://graph.facebook.com/v11.0/${pixelId}/events`;

    this.eventName = eventObj.eventName;
    this.eventId = eventObj.eventId;
    this.eventSourceUrl = eventObj.eventSourceUrl;
    this.userData = userData; //Should hash some key-value
    this.customData = customData;
  }

  public async request(): Promise<boolean> {
    if (!this.fbToken) return false;
    try {
      const event = {
        data: [
          {
            event_name: this.eventName,
            event_id: this.eventId,
            event_source_url: this.eventSourceUrl,
            event_time: Math.floor(+(new Date()) / 1000),
            user_data: this.userData,
            custom_data: this.customData,
            action_source: "website"
          }
        ],
      };
      const body = JSON.stringify(event);

      const response = await fetch(`${this.uri}?access_token=${this.fbToken}`, {
        method: 'POST',
        body,
        headers: {'Content-Type': 'application/json'}
      });
      const data = await response.json();
      return data['events_received'] == 1;
    } catch (e) {
      return false;
    }
  }
}

export default FacebookServerSideApi;
I removed hashing logic used on Line 20, and it should hash each key described here. Finally, after Deploying to AWS and sending the request by Postman or the frontend library, the Overview should show the event log.
That’s all. Now we can send such as PageView or other events defined by Facebook Pixel and Facebook Conversions API on the same page.
