· Joseph · Side projects  · 3 min read

[Side project] KinectV2 applications migrates to OpenPose

OpenPose 經過了三個多月的努力,終於完成了偵測器的轉換。 會有這次的side project是因為剛好看到OpenPose這套人體姿態辨識的AI函數庫,只要用單單一個RGB camera就可以偵測出人的動作,這讓我想到以前解決Asus xtion pro停產的問題,就是要轉換轉換Asus xtion到KinectV2。現在KinectV2雖已停產,但網路上還是可以透過各種管道買到KinectV2,我就想趁這機會把KinectV2轉換到OpenPose試試看,看未來是不是只要一個RGB camera,就不用再擔心KinectV2真的買不到的問題了。

OpenPose: CMU-Perceptual-Computing-Lab / openpose

他在安裝上還是有一些環境的限制,實際可以參考這裡,才不會鬼打牆太久。

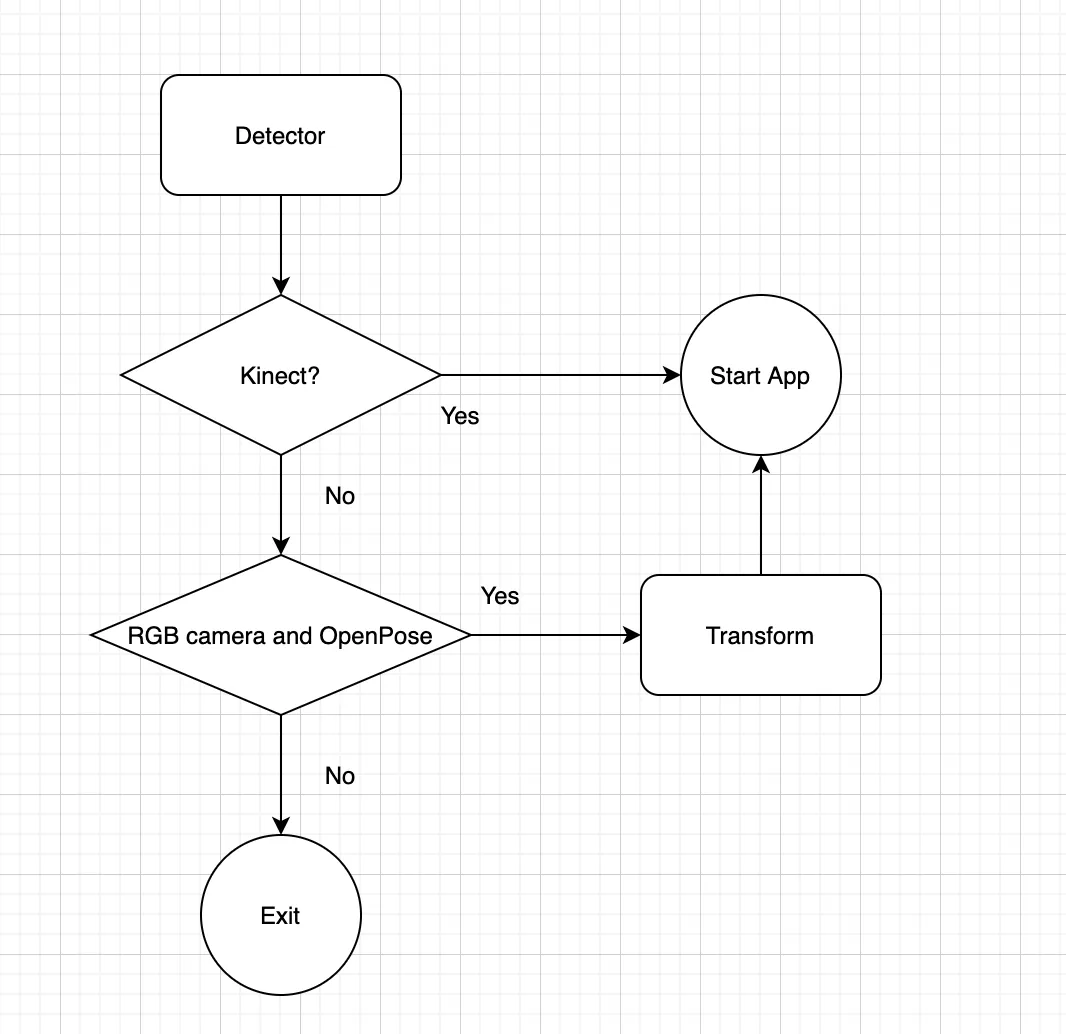
接下來我就來分享一下轉換的方法。一張圖道盡前言萬語。 flowchart

Code是不能講得太明白,不過應該流程圖就能推知一二。最難的就是Transform這一層,要把OpenPose的座標空間跟KinectV2做對應,才能在進入程式時順利進行。以前KinectV2轉xtion OpenNI的時候根本是悲劇,那時候又用了一個不再繼續維護的套件ZigFu,整個包得死死的,所有資料型態跟資料結構都要自己去猜。還好從那之中學到很多,這次的轉換才能順利一點。

另外Transform這一層還可以做很多應用,包含過濾特定物件、物件取代、或特定的辨識,甚至是之後有更好更快的演算法,都可以在這一層做調整跟測試。中間有一些商業機密不太能公開,不過如果有類似問題歡迎私訊,我們很樂於分享我們的經驗。
Back to Blog

Related Posts

View All Posts »
BMAD-Method intro

BMAD-Method intro

這是自發性的連續寫30篇教學文章,不是很想把文章發在ithelp,來這邊挑戰一下自己寫30天BMAD-Method相關的技術文章,預計會用BMAD-Method做各種不擅長的專案。期間可能會視情況購置需要的AI agent plans,可能是Claude Code, OpenAI, 或Gemini都說不定,看token燃燒速度而定。 第一篇先來介紹介紹BMAD-Method這個 AI Agent Framework吧。 TOC

Use Grafana MCP with Gemini and n8n

Use Grafana MCP with Gemini and n8n

The Model Context Protocol (MCP) is extremely useful. An AI assistant helps you decide when and how to use connected tools, so you only need to configure them. After integrating MCP logging management systems into several of my projects, it has saved me a significant amount of time. In this article, I'm going to integrate Grafana with the Gemini CLI and n8n. I will chat with the Gemini CLI and n8n and have them invoke the Grafana MCP server. structure TOC

Use Figma MCP server with Gemini CLI

Use Figma MCP server with Gemini CLI

In this article, I won't introduce what MCP is. Instead, I will explain how to set up the Figma MCP server and use Gemini as an MCP client to work with Figma. I will also show you how to run a prompt to get a Figma design with Gemini. TOC

Install Gemini CLI

Install Gemini CLI

Introduction Gemini CLI has been one of the most popular AI agents in the first half of 2025. It's similar to Claude Code, bringing its power directly into your terminal. Although other terminal AI agents exist, their pricing plans are quite different. Gemini CLI provides a free tier with 100 requests per day using Gemini 2.5 Pro, and you can unlock Tier 1 by upgrading to a paid plan. Prerequisites I'm going to use npm to install Gemini. My Node.js version is v24.4.1, and my npm version is 11.4.2. Gemini needs Node.js version 20 or higher installed. If you're using macOS, you can also choose Homebrew to install the Gemini CLI. Installation Now, let's install it using npm. After installation, you can run gemini directly in your terminal. npm install -g @google/gemini-cli installation I'm using the Use Gemini API key authentication method, so I need to generate a key from Google AI Studio and set it in .zshrc (or .bashrc) by adding this line: And then you can try Gemini now! Run some examples example Prompt: give me suggestions for the socket functionality of this project? Response: Conclusion: The Gemini installation is very simple. Although I am using Neovim with Avante, Gemini gives me more power to use the terminal. Next, I will explore how to use Gemini with an MCP server and integrate the workflow into my daily tasks.