AWS Cloud Development Kit (CDK) project structure

Previously blog I used NodeJs/Typescript as a backend and deployed with AWS Cloud Development Kit (AWS CDK). The same framework, but more complex than the sample, is used on our Firstage. So this post I will show how we structure our AWS CDK project codebase.
Project Structure
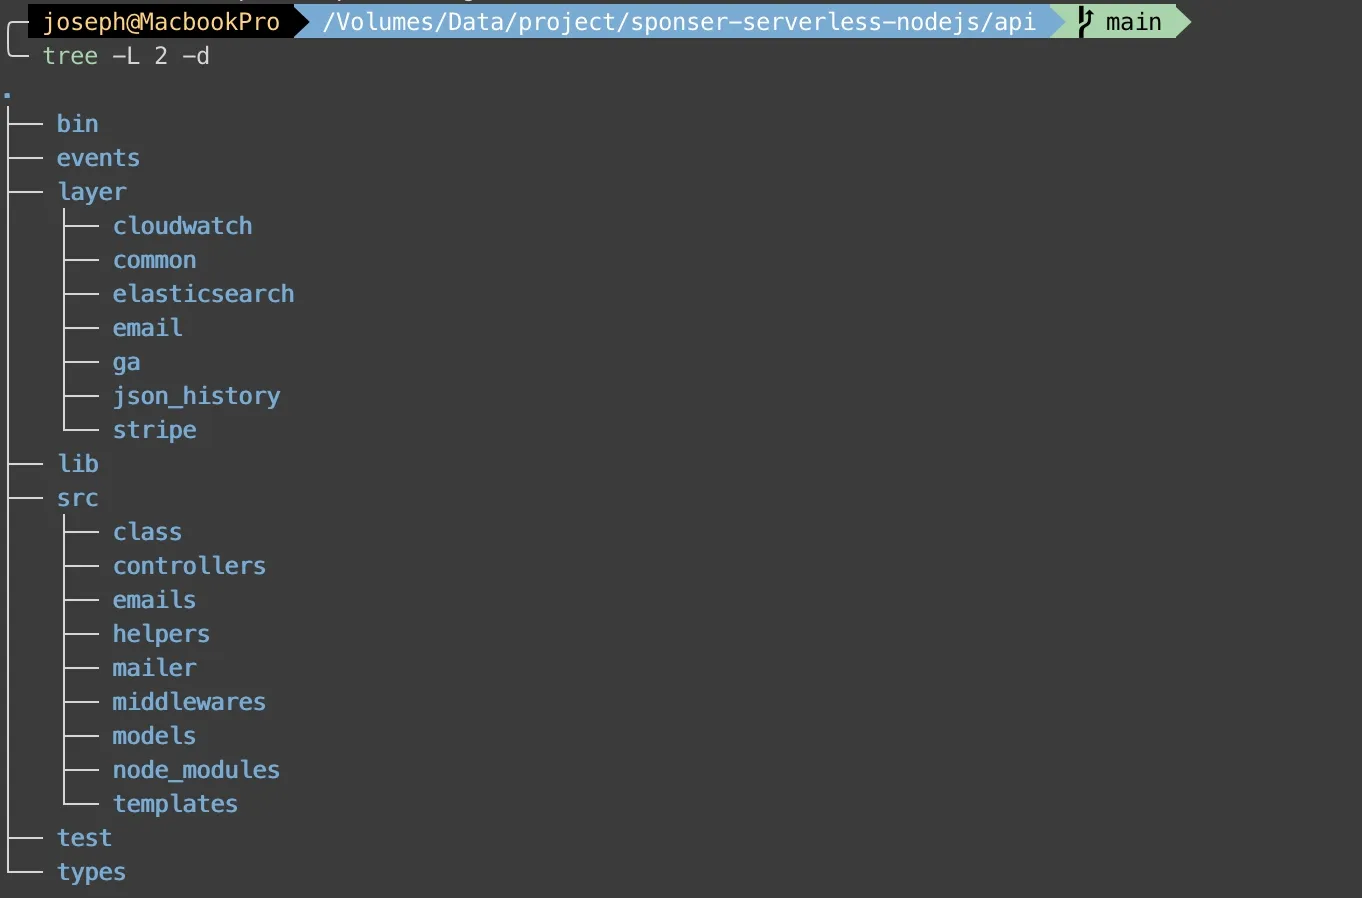
As you saw, we have several folders in the project:
- bin: Contains only one file lets
cdk deployknow which env should deploy, - events: Saves JSON object which AWS SAM uses,
- lib: Configures each service we used on AWS, such as route53, dynamodb, lambda, API gateway, and secret manager
- src: Puts all codes like controllers, models, and helpers here.
- test: Puts testing codes.
- types: Defines types for Typescript.
- layer: Installs
npm packagerelative to lambdas.
We move out layer from src because sometimes we need to debug the code on AWS lambda editor. Now let me show some important files and codes.
bin/api.ts
#!/usr/bin/env node
import 'source-map-support/register';
import * as cdk from '@aws-cdk/core';
import { ApiStack } from '../lib/api-stack';

const app = new cdk.App();

// SYNTAX:
// new ApiStack(app, 'THIS_NAME_FOR_CDK_DEPLOY', { stackName: 'THIS_NAME_FOR_AWS_CloudFormation_StackName' });
new ApiStack(app, 'ApiStaging', { stackName: 'ApiStaging' });
new ApiStack(app, 'ApiProduction', { stackName: 'ApiProduction' });
This is an entry point and simply point to lib/api-stack file, and then we can use cdk deploy ApiStaging or cdk deploy ApiProduction to deploy.
lib/api-stack.ts
import * as cdk from '@aws-cdk/core';
import * as lambda from '@aws-cdk/aws-lambda';
import * as elasticsearch from '@aws-cdk/aws-elasticsearch';
import { DynamoEventSource } from '@aws-cdk/aws-lambda-event-sources';
import * as iam from '@aws-cdk/aws-iam';
import events = require('@aws-cdk/aws-events');
import targets = require('@aws-cdk/aws-events-targets');
import type { EnvType } from '../types/api-stack';
import SecretManager from './secret-manager';
import Lambda from './lambda';
import Route53 from './route53';
import HttpApi from './http-api';
import DbConfig from './dynamodb';

const params: EnvType = {
    ApiStaging: {
      ...
    },
    ApiProduction: {
      ...
    }
};

export class ApiStack extends cdk.Stack {
  constructor(scope: cdk.App, id: "ApiStaging" | "ApiProduction", props?: cdk.StackProps) {
    super(scope, id, props);

    const envParams = params[id];
    const { ENV, route53Params, httpApiParams } = envParams;

    const secretParams = SecretManager(this, envParams.secretManager.arn, envParams.secretManager.keys);

    const layerCommon: lambda.ILayerVersion = new lambda.LayerVersion(this, "LayerCommon", {
      compatibleRuntimes: [lambda.Runtime.NODEJS_14_X],
      code: lambda.Code.fromAsset('layer/common'),
    });

    const {
      testEvent, test2Event
    } = Lambda(this, { ENV });

    const TestEventLambda = testEvent([layerCommon]);
    const Test2EventLambda = test2Event([layerCommon]);

    Test2EventLambda.addEnvironment('testLambdaArn', TestEventLambda.functionArn);

    [ TestEventLambda, Test2EventLambda ].forEach((lambdaFunc) => {
      const envs: {[key: string]: string} = { secretToken: secretParams.secretToken };
      Object.keys(envs).forEach((key) => {
        lambdaFunc.addEnvironment(key, envs[key]);
      });
    });

    [ TestEventLambda, Test2EventLambda ].forEach((lambdaFunc) => {
      lambdaFunc.addToRolePolicy(new iam.PolicyStatement({
        effect: iam.Effect.ALLOW,
        actions: ['dynamodb:*'],
        resources: ['*']
      }));
    });

    const { domainName } = Route53(this, route53Params);

    const eventLambdaMapping = {
      testEvent: TestEventLambda,
      test2Event: Test2EventLambda,
    }
    HttpApi(this, domainName, eventLambdaMapping, httpApiParams);

    const DynamoDB = DbConfig(this, { dynamoDBTablePrefix, ENV });
  }
}
The skeleton is our ApiStack. We defines AWS services to files seperately, and import into this ApiStack. Let’s go through from top to down. First, on lines 8, 15, 28 and 29 of lib/api-stack.ts we define type for our envParams.
types/api-stack.ts
export type ParamsType = {
  ENV: string,
  userPool: string,
  domainEndpoint: string,
  dynamoDBTablePrefix: string,
  route53Params: Route53EnvParam,
  httpApiParams: HttpApiEnvParam,
  secretManager: {
    arn: string,
    keys: string[]
  },
  cognitoParams: {
    clientId: string
  },
  fbPixelID: string,
}

export type EnvType = {
  ApiStaging: ParamsType,
  ApiProduction: ParamsType
}
The Route53EnvParam and HttpApiEnvParam are just some constant strings relatives to Route53 and Api Gateway. We have to mention that secretManager we hard-coded the keys used on AWS Secrets Manager, and lib/secret-manager.ts uses it on the line 36 and 48 of lib/api-stack.ts.
lib/secret-manager.ts
// import * as ssm from '@aws-cdk/aws-ssm';
import * as secretsmanager from '@aws-cdk/aws-secretsmanager';
import * as cdk from '@aws-cdk/core';

const secretManager = (scope: cdk.Construct, arn: string, keys: string[]): { [key: string]: string } => {
  const secret = secretsmanager.Secret.fromSecretCompleteArn(scope, 'ImportedSecret', arn);
  return keys.reduce((params, key) => ({ ...params, [key]: secret.secretValueFromJson(key) }), {});
  /*
  const ssmParams: { [key: string]: string } = {};
  Object.keys(params).forEach(name => {
    const param = ssm.StringParameter.fromStringParameterAttributes(scope, name, {
      parameterName: params[name],
      // 'version' can be specified but is optional.
    });
    ssmParams[name] = param.stringValue;
  });
  return ssmParams
  */
};

export default secretManager;
THe codes we commented are AWS Systems Manager, but now we change to AWS Secrets Manager. As the code above, we reduce simply keys array to key-value object.
But here is an issue when you change value from AWS Secrets Manager, you have to remove the env value from lambda and re-add again.
On the line 33 to 36 of lib/api-stack.ts defines a layer. The following image shows layer folder. 
Then, we get lambda definitions from lib/lambda.ts, and set environments and policiess to them on line 38 to 55.
lib/lambda.ts
import * as cdk from '@aws-cdk/core';
import * as lambda from '@aws-cdk/aws-lambda';

const lambdas = (scope: cdk.Construct, envParams?: { [key: string]: string }) => {
  const funcDefaultProps = {
    runtime: lambda.Runtime.NODEJS_14_X,
    code: new lambda.AssetCode('src'),
    memorySize: 1536,
    environment: envParams
  };
  return {
    testEvent: (layers: lambda.ILayerVersion[]) => new lambda.Function(scope, 'testEvent', {
      ...funcDefaultProps,
      handler: 'controllers/test/index.handler',
      layers,
      tracing: lambda.Tracing.ACTIVE,
      timeout: cdk.Duration.seconds(10),
    }),
    test2Event: (layers: lambda.ILayerVersion[]) => new lambda.Function(scope, 'test2Event', {
      ...funcDefaultProps,
      handler: 'controllers/test2/index.handler',
      layers,
      tracing: lambda.Tracing.ACTIVE,
      timeout: cdk.Duration.seconds(10),
    }),
  }
};
Lastly, Route53, HttpApi and Dbconfig are the same structure as lib/lambda.ts. We set dns, domain name and ip in lib/route53.ts, authorizer and router in lib/http-api.ts, and table and global secondary key in lib/dynamodb.ts.
lib/route53.ts
import * as cdk from '@aws-cdk/core';
import * as apigw from '@aws-cdk/aws-apigatewayv2';
import * as route53 from '@aws-cdk/aws-route53';
import * as acm from '@aws-cdk/aws-certificatemanager';
import * as targets from '@aws-cdk/aws-route53-targets';
import type { Route53EnvParam } from '../types/api-stack'

const Route53 = (scope: cdk.Construct, envParams: Route53EnvParam) => {
  const { zoneName, certArn, domain, aRecord } = envParams;
  const zone = route53.HostedZone.fromHostedZoneAttributes(scope, 'HostedZone', {
    zoneName,
    hostedZoneId: 'YOUR_ID'
  });
  const domainName = new apigw.DomainName(scope, domain.id, {
    domainName: domain.domainName,
    certificate: acm.Certificate.fromCertificateArn(scope, 'cert', certArn),
  })
  new route53.ARecord(scope, aRecord.alias.id, {
    zone,
    recordName: aRecord.alias.recordName,
    target: route53.RecordTarget.fromAlias(new targets.ApiGatewayv2Domain(domainName)),
  });

  return { domainName };
};

export default Route53
lib/http-api.ts
import * as cdk from '@aws-cdk/core';
import * as apigw from '@aws-cdk/aws-apigatewayv2';
import { CorsHttpMethod } from '@aws-cdk/aws-apigatewayv2/lib/http/api';
import * as apigwIntergration from '@aws-cdk/aws-apigatewayv2-integrations';
import * as authorizers from '@aws-cdk/aws-apigatewayv2-authorizers';
import * as lambda from '@aws-cdk/aws-lambda';
// import * as cognito from '@aws-cdk/aws-cognito';
import type { HttpApiEnvParam } from '../types/api-stack'

const HttpApi = (
  scope: cdk.Construct,
  domainName: apigw.DomainName,
  handlers: { [key: string]: lambda.Function },
  envParams: HttpApiEnvParam
) => {
  const { id, jwtAudience, jwtIssuer, stageId, stageName } = envParams;
  const authorizer = new authorizers.HttpJwtAuthorizer({
    jwtAudience,
    jwtIssuer
  });
  const httpApi = new apigw.HttpApi(scope, id, {
    createDefaultStage: false,
    corsPreflight: {
      allowHeaders: ['Authorization', 'Content-Type'],
      allowMethods: [CorsHttpMethod.GET, CorsHttpMethod.HEAD, CorsHttpMethod.OPTIONS, CorsHttpMethod.POST, CorsHttpMethod.PUT, CorsHttpMethod.DELETE],
      allowOrigins: ['*'],
    },
  })

  httpApi.addStage(stageId, {
    autoDeploy: true,
    domainMapping: {
      domainName,
    },
    stageName: stageName || "dev"
  });
  httpApi.addRoutes({
    path: '/test',
    methods: [apigw.HttpMethod.GET, apigw.HttpMethod.PUT],
    integration: new apigwIntergration.LambdaProxyIntegration({
      handler: handlers["testEvent"],
    }),
  });
  httpApi.addRoutes({
    path: '/test2',
    methods: [apigw.HttpMethod.GET, apigw.HttpMethod.PUT],
    integration: new apigwIntergration.LambdaProxyIntegration({
      handler: handlers["test2Event"],
    }),
  });
};
export default HttpApi;
lib/dynamodb.ts
import * as cdk from '@aws-cdk/core';
import { StreamViewType, Table, AttributeType as DbAttributeType, BillingMode } from '@aws-cdk/aws-dynamodb';

// Please remember to return the Table you new
const DbConfig = (scope: cdk.Construct, { dynamoDBTablePrefix, ENV }: { dynamoDBTablePrefix: string, ENV: string }) => {
  const TestTable = new Table(scope, 'TestTable', {
    partitionKey: { name: 'target', type: DbAttributeType.STRING },
    sortKey: { name: 'id', type: DbAttributeType.STRING },
    // stream: StreamViewType.NEW_IMAGE,
    tableName: `${dynamoDBTablePrefix}_Tests`,
    billingMode: BillingMode.PAY_PER_REQUEST,
    pointInTimeRecovery: ENV === 'production',
  });
  TestTable.addGlobalSecondaryIndex({
    indexName: "TestGSI_target_created_at",
    partitionKey: { name: 'target', type: DbAttributeType.STRING },
    sortKey: {
      name: "created_at",
      type: DbAttributeType.NUMBER
    }
  });

  // Get EventSource from table and stream it to lambda
  return { TestTable }
};
That’s our cdk project structure. If you have a long file of ApiStack, you may consider and try our setting.


