Using Firebase and Firestore with NextJS and Docker - Part 2 - Setup firebase in Next.js

On our previous post shows how to integrate firebase with docker. This article we will integrate Next.js with firebase, and then deploy app with Github actions. In this webapp, we can input cryptocurrency name, and upload logo, and therefore we use firestore to save Tokens collection and Cloud Storage to save logo images.
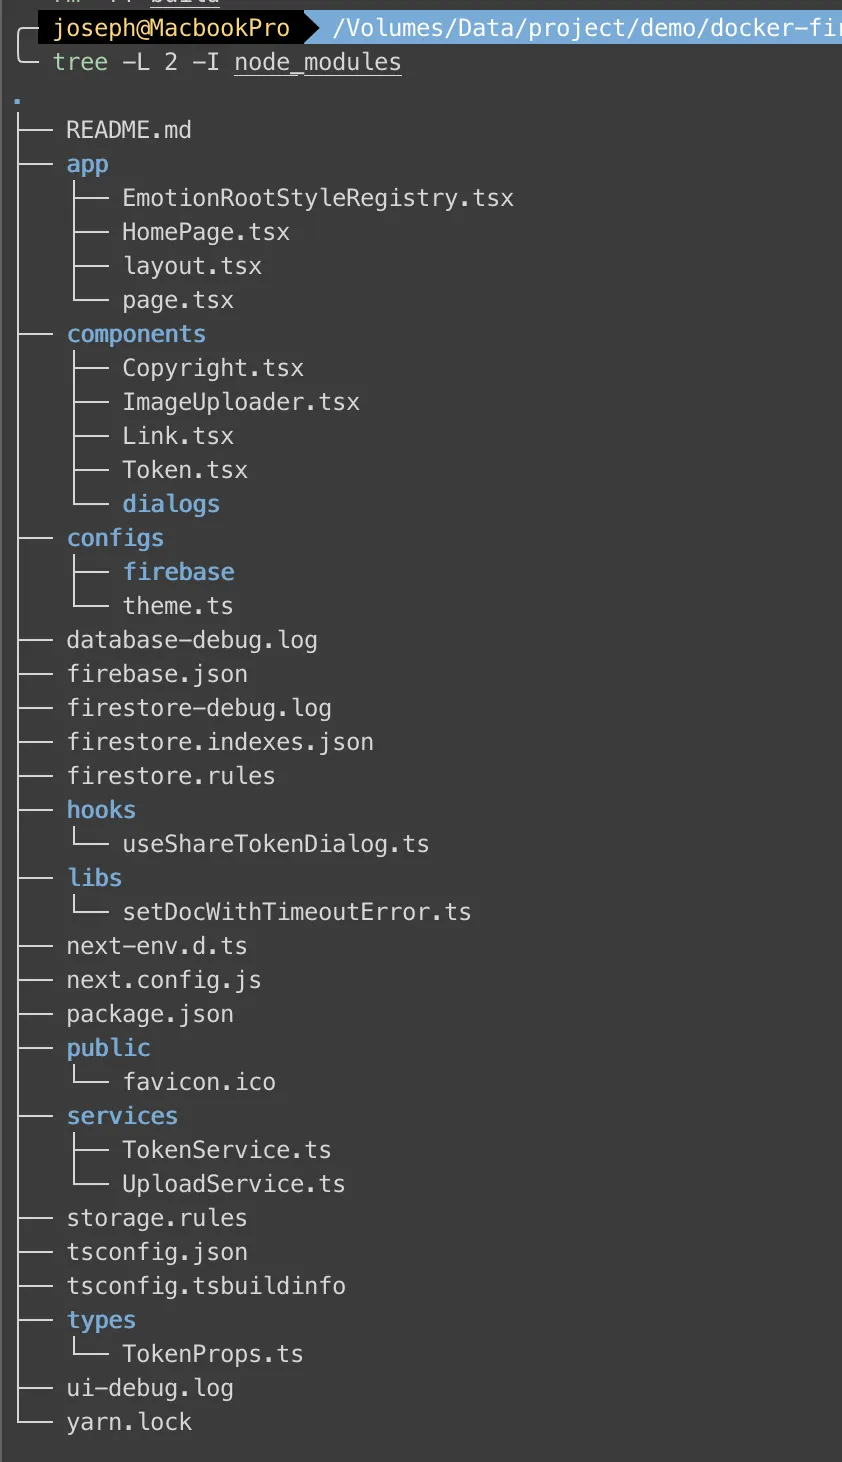
Project structure
 We use NextJS 13 with
 appDir folder, so we have layout.tsx and page.tsx in appDir. Keep your eye on EmotionRootStyleRegistry.tsx, in this example we use Material UI and Emotion so we need to wrap a Provider (client component) in our layout.tsx. Only by doing this, we can use them with NextJS 13.
Firebase config
We configure our Firebase object in configs/firebase/index.ts
configs/firebase/index.ts
import { initializeApp } from "firebase/app";
import { getStorage, connectStorageEmulator } from "@firebase/storage";
import {
  connectFirestoreEmulator,
  enableIndexedDbPersistence,
  initializeFirestore,
  CACHE_SIZE_UNLIMITED,
} from "@firebase/firestore";

const firebaseConfig = {
  apiKey: process.env.FIREBASE_API_KEY,
  authDomain: "fir-firebase-94fdd.firebaseapp.com",
  projectId: "fir-firebase-94fdd",
  storageBucket: "fir-firebase-94fdd.appspot.com",
  messagingSenderId: process.env.FIREBASE_MESSAGING_SENDER_ID,
  appId: process.env.FIREBASE_APP_ID,
};

const app = initializeApp(firebaseConfig);
const cloudStorage = getStorage(app);
// const db = getFirestore(app);
const db = initializeFirestore(app, {
  cacheSizeBytes: CACHE_SIZE_UNLIMITED,
  ignoreUndefinedProperties: true,
});
if (process.env.NODE_ENV !== "production") {
  connectStorageEmulator(cloudStorage, "localhost", 9199);
  connectFirestoreEmulator(db, "localhost", 8080);
}
if (typeof window !== "undefined") {
  enableIndexedDbPersistence(db);
}
export { cloudStorage, db };
Firstly, FIREBASE_API_KEY, FIREBASE_MESSAGING_SENDER_ID, and FIREBASE_APP_ID are set in environment variable. Secondly, we connect our cloudStorage and db with emulator when we are not in production. Thirdly, we set db as a offline-first database by enableIndexedDbPersistence. And lastly we export cloudStorage and db directly.
appDir files
Now, let’s dig into our appDir files: layout.tsx, page.tsx, and HomePage.tsx.
app/layout.tsx
import { ReactNode } from "react";
import Copyright from "@/components/Copyright";
import EmotionRootStyleRegistry from "./EmotionRootStyleRegistry";

export default function RootLayout({ children }: { children: ReactNode }) {
  return (
    <html>
      <head></head>
      <body>
        <EmotionRootStyleRegistry>
          {children}
          <Copyright />
        </EmotionRootStyleRegistry>
      </body>
    </html>
  );
}
export const metadata = {
  title: {
    default: "NextJS and Firebase",
    template: "%s | NextJS and Firebase",
  },
  description: "Generated by create next app",
  viewport: {
    width: "device-width",
    initialScale: 1,
    maximumScale: 1,
  },
};
The metadata in layout.tsx will render into <head></head>. Besides RootLayout, you can have many nested layout in each sub-routes, and use generateMetadata with title template to generate title in each nested layout.
app/page.tsx
import HomePage from "./HomePage";

export default function Page() {
  return <HomePage />;
}
Our page.tsx is a very simple server component. We can fetch data or set metadata over here if necessary.
app/HomePage.tsx
"use client";

import { Container, Typography, Box, Button } from "@mui/material";
import { useCallback, useEffect, useState } from "react";
import { useShareTokenDialog } from "@/hooks/useShareTokenDialog";
import TokenInfoDialog from "@/components/dialogs/TokenInfoDialog";
import * as TokenService from "@/services/TokenService";
import { TokenInfoProps } from "@/types/TokenProps";
import Token from "@/components/Token";

export default function HomePage() {
  const { setDialog } = useShareTokenDialog();
  const [tokens, setTokens] = useState<TokenInfoProps[]>([]);
  const fetchTokens = useCallback(async () => {
    const data = await TokenService.getTokens();
    setTokens(data);
  }, []);

  useEffect(() => {
    fetchTokens();
  }, [fetchTokens]);

  return (
    <Container maxWidth="lg">
      <Box
        sx={{
          my: 2,
          display: "flex",
          justifyContent: "space-between",
          alignItems: "center",
        }}
      >
        <Typography variant="h4" component="h1">
          Token List
        </Typography>
        <Button
          variant="contained"
          onClick={() => setDialog({ open: true, isCreate: true })}
        >
          Add Token
        </Button>
      </Box>
      <Box display="flex" sx={{ mx: "auto", width: "90%" }}>
        {tokens.map((token) => (
          <Token key={token.id} {...token} />
        ))}
      </Box>
      <TokenInfoDialog onSave={fetchTokens} />
    </Container>
  );
}
Our HomePage.tsx client component is more complicted. Let’s us focus on useShareTokenDialog hook and TokenService. Instead of redux, in this example we use use-between to share state between components. It’s really easy and useful.
hooks and Service
We won’t go through every component, but you can find it on our github repo. But how we save data to firesotre and storage? We implement it in our TokenService and UploadService!
services/TokenService.ts
import { v4 as uuidv4 } from "uuid";
import { collection, getDocs, getDoc, doc } from "firebase/firestore";
import { TokenInfoProps } from "@/types/TokenProps";
import setDocWithTimeoutError from "@/libs/setDocWithTimeoutError";
import { db } from "@/configs/firebase";

export const setToken = async (
  tokenInfo: TokenInfoProps
): Promise<TokenInfoProps> => {
  if (!tokenInfo.id) {
    tokenInfo.id = uuidv4();
  }
  try {
    await setDocWithTimeoutError(`tokens/${tokenInfo.id}`, tokenInfo);
  } catch (e) {}
  return tokenInfo;
};

export const getToken = async (id: string): Promise<TokenInfoProps | null> => {
  const docRef = doc(db, "tokens", id);
  const tokenSnapshot = await getDoc(docRef);
  if (tokenSnapshot.exists()) {
    return tokenSnapshot.data() as TokenInfoProps;
  } else {
    return null;
  }
};
export const getTokens = async (): Promise<TokenInfoProps[] | []> => {
  const tokensSnapshot = await getDocs(collection(db, "tokens"));
  return tokensSnapshot.docs.map((snap) => snap.data() as TokenInfoProps);
};
services/UploadService.ts
import { ref, uploadBytesResumable, getDownloadURL } from "firebase/storage";
import { cloudStorage } from "configs/firebase";

export const uploadFromBlobAsync = async (
  file: File,
  folder: string,
  onSuccess: (url: string) => void,
  onError = (err?: Error) => {}
) => {
  if (!file) return null;
  const storageRef = ref(cloudStorage, `/${folder}/${Date.now()}_${file.name}`);
  const uploadTask = uploadBytesResumable(storageRef, file);
  uploadTask.on(
    "state_changed",
    () => {},
    onError,
    () => {
      getDownloadURL(uploadTask.snapshot.ref).then((url) => {
        onSuccess(url);
      });
    }
  );
};
As you see, there are many Firestore methods such as collection, getDocs, getDoc, and doc, and we import db from configs so that we can manipulate firestore database. On the other hand, our UploadService imports cloudStorage and handles Storage methods.
You can implement your components as you wish, but now we’re gonna to deploy to Firebase.
Deploy
We use Github action to deploy our app. You can generate a template by firebase init hosting, choose webframeworks, and login authorize Github to deploy.
.github/workflows/firebase-hosting-merge.yml
name: Deploy to Firebase Hosting on merge

permissions:
  checks: write
  contents: read
  pull-requests: write

'on':
  push:
    branches:
      - main

jobs:
  build_and_deploy:
    runs-on: ubuntu-latest
    defaults:
      run:
        working-directory: ./app
    environment: production
    steps:
      - uses: actions/checkout@v3

      - name: Use Node.js ${{ matrix.node-version }}
        uses: actions/setup-node@v3
        with:
          node-version: ${{ matrix.node-version }}

      - run: yarn install --immutable && yarn build

      - name: Enable Firebase Experiments
        run: /usr/local/bin/npx firebase-tools@latest experiments:enable webframeworks

      - uses: FirebaseExtended/action-hosting-deploy@v0
        with:
          entrypoint: "./app"
          repoToken: '${{ secrets.GITHUB_TOKEN }}'
          firebaseServiceAccount: '${{ secrets.FIREBASE_SERVICE_ACCOUNT_FIR_FIREBASE_94FDD }}'
          channelId: live
          projectId: fir-firebase-94fdd
        env:
          FIREBASE_CLI_EXPERIMENTS: webframeworks
          FIREBASE_API_KEY: '${{ secrets.FIREBASE_API_KEY }}'
          FIREBASE_MESSAGING_SENDER_ID: '${{ secrets.FIREBASE_MESSAGING_SENDER_ID }}'
          FIREBASE_APP_ID: '${{ secrets.FIREBASE_APP_ID }}'
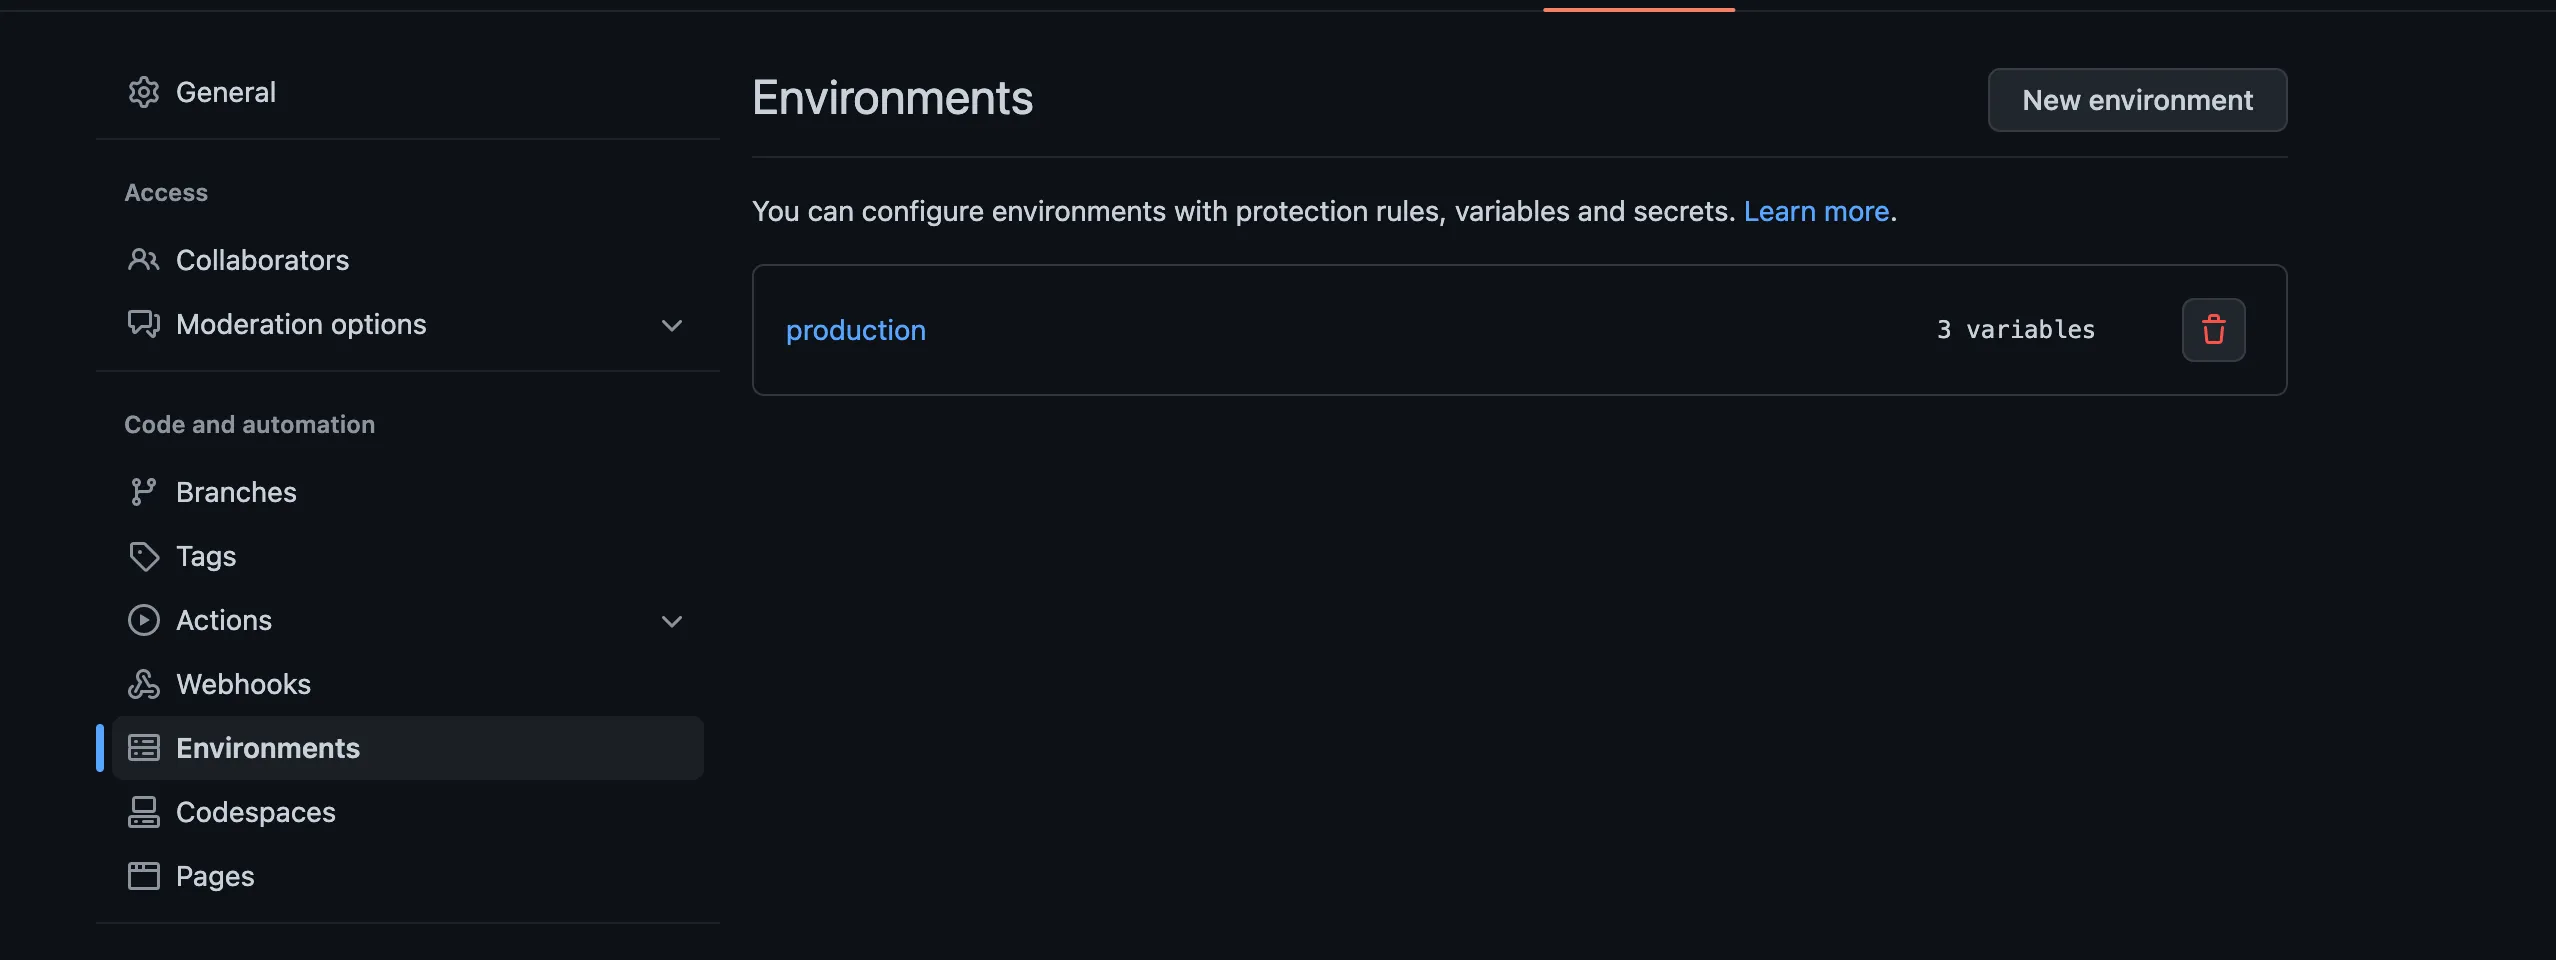
By the way, we set production environment and environment variables on Github repository settings. 
It’s time to commit, push, deploy, and go to your firebase url to see result.
If you got an deploy 403 error, please add some
IAM permissionsby checking:
Conclusion
Finally we get an opportunity to use NextJS 13 appDir. Although it’s still an experimental feature, we feel that is more intuitive to organize server-side and client-side components. Some packages are not supported now, but you still can find a patch easily by Google or ChatGPT.
In this simple example, even through we don’t build relationships in database and don’t use Firebase Auth or Firebase Function, we use NextJS 13 appDir folder integrating with Firebase, Firestore, and Cloud Storage. And, it is also worth of reference if you want to use Firebase Emulator in docker-compose. If you need more details about this project, please go to Github repo. Hope this is useful for you.

